Senior Mobile Developer - Vale

Contact me via @cwtututu.


  • Home

  • Categories

  • Archives

  • Tags

  • About

Swift Study Notes

Posted on Oct 4 2014   |   0 Comments

402-hd-introduction-to-swift.mov

  1. This is a general principle in Swift, that we prefer immutability or constants by default and only really opt into mutablility or variables where things actually need to change. Now this makes your code safer in a multi-threaded environment. It also means that Swift can optimize your code more effectively because it knows what isn’t going to change and it just generally makes your code more readable, makes your intent clearer that you’re saying what is and isn’t going to vary.
  1. Swift initializers don’t return a value. Rather, their main role to make sure that every stored property has a value by the time its initialization completes.

  2. Non-Optional Types can’t be nil.

#403-hd-intermediate-swift.mov

  1. Weak References tell Swift that this object isn’t responsible for keeping the object on the other end alive. And weak references in Swift are modeled as optinonal values.

  2. Unowned References tell Swift that although I don’t have an owning stake in the object, my lift depents on it, I can’t live without my owner, my card holder.

  3. Every value must be initialized before it is used.

  4. Initializers handle the responsibility of fully initailizing an instance.

  5. We always make sure we set our own properties before we call our SuperClass’s initializer.

  6. Convenience Initializers

1
2
3
4
5
6
7
init (color: Color, turbo: BOOl) {
......
}
convenience init(color: Color) {

self.init(color: color, turbo: true)
}
  1. Lazy Properties.

It will only be evaluated the time it’s accessed and only when it’s accessed and only that one time.

1
@lazy var multiplayerManager  = MultiplayerManager()
  1. Initialization

Initialize all values before you use them.

Set all stored properties first, then call super.init

Designated initializers only delegate up

Convenience initializers only delegate across

Deinitializers are there…if you need them.

All Activities

Posted on Sep 17 2013   |   In Activities   |   0 Comments


RescueTime: Project Time Tracking Software
& Team Time Management Software


<!– a little how-to

  • Paste this into your web page where you want the chart.
  • You may have multiple embedded charts on the same page.
  • You can change the title, width and height by editing the named properties.
  • You can opt for the more verbose full chart by setting .kind to ‘default’.
  • If you want your own css control, you can add ‘rtapi.my_css = true;’ before the render function.
  • css class names are:
  • rtdiv : the whole container
  • rttitle : the title, rtchart : the chart, rtfeed : the footer
    –>

How to Import One Project to Another One in Xcode.

Posted on Sep 16 2013   |   In Sub-Project   |   0 Comments

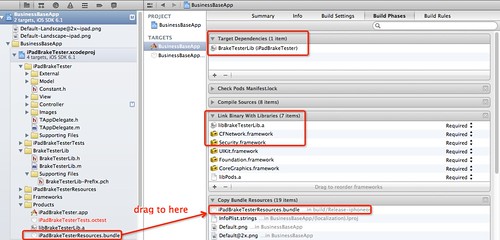
Due to user needs, I have to import one project to another one as a sub-project. The final result should be like the following picture.

It is not easy to do this. We need some steps.

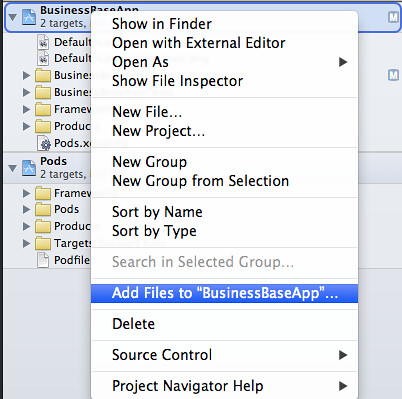
  • Step 1, Add “iPadBrakeTester.xcodeproj” file to BusinessBaseApp project, note that don’t choose the “Copy items into…” checkbox.
  • Step 2, close the iPadBrakeTester project, because you have opened the project in BusinessBaseApp project. If you don’t, you can just see the “iPadBrakeTester.xcodeproj” file and there is no triangle front of it, you will can’t expand it.

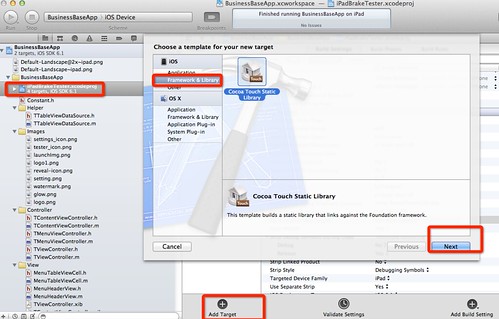
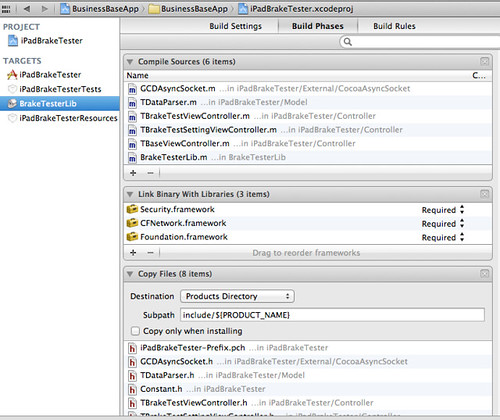
  • Step 3, generate static library. Choose “iPadBrakeTester.xcodeproj”,add Target. After generating static library, add .m, .h and .framework files to it.

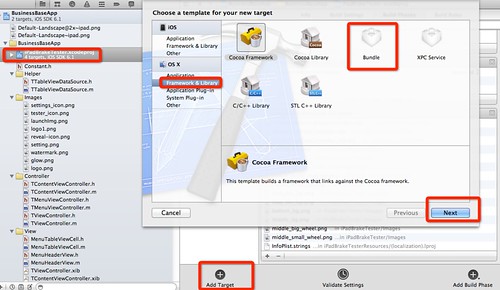
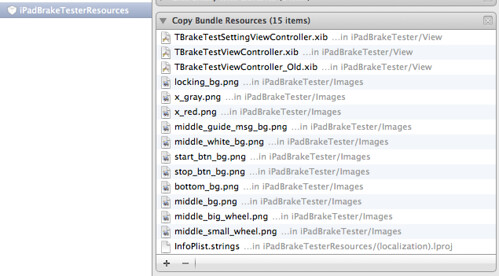
  • Step 4, generate Bundle, and change the relevant settings to iOS target.

Then, add .xib and iamge files to it, like this:

  • Step 5, Use static library and Bundle in BusinessBaseApp project.

“Target Dependencies” means that it needs to rebuild the app object code if code in the dependency changes.

In “Link Binary With Libraries”,beside adding the static library, you need add the .framework files which you import to the sub-project.

  • Step 6, add “-ObjC” and “-all_load” flags to “Other Linker Flags”.

    -ObjC because otherwise the linker does not properly load your classes.

    -all_load if you have categories in the library, because otherwise those are not loaded.

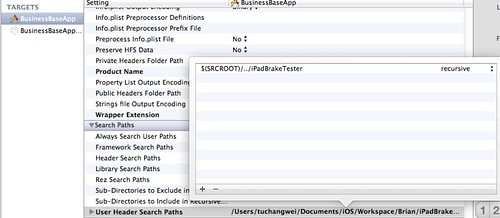
  • Step 7, add the sub-project path to “User Header Search Paths”, like this:

  • Step 8, use Bundle in code.
1
2
3
4
5
6
7
8
9
10
11
12
13
14
15
16
17
18
19
20
21

#pragma mark - Setup Views.
- (void)setupContentView
{
NSBundle *bundle = [NSBundle bundleWithURL:[[NSBundle mainBundle] URLForResource:@"iPadBrakeTesterResources" withExtension:@"bundle"]];
self.settingsViewController = [[TBrakeTestSettingViewController alloc] initWithNibName:@"TBrakeTestSettingViewController" bundle:bundle];

self.settingsViewController.view.frame = self.view.frame;
[self addChildViewController:self.settingsViewController];
[self.view addSubview:self.settingsViewController.view];
[self.settingsViewController didMoveToParentViewController:self];

self.brakeTestViewController = [[TBrakeTestViewController alloc] initWithNibName:@"TBrakeTestViewController_Old" bundle:bundle];
self.brakeTestViewController.view.frame = self.view.frame;
[self addChildViewController:self.brakeTestViewController];
[self.view addSubview:self.brakeTestViewController.view];
[self.brakeTestViewController didMoveToParentViewController:self];


}

Some references:

Sub-Projects in Xcode

iOS Library With Resources

Some Git Commands

Posted on Sep 15 2013   |   In Git   |   0 Comments
1
2
3
4
5
6
7
8
9
10
11
12
13
14
15
	
git config --global color.ui true # support color global.

git reset --hard 89428ab23e4bd3028c95b4b4064075b3901654a3 # reset HEAD, index and working tree

git branch -a # List both remote-tracking branches and local branches.

git branch backups # new branch backups.

git push origin backups:backups # push local branch to remote branch.

git push origin :backups # delete remote branch backups.

git branch -d backups # delete local branch backups.

1
2
3
4
5
6
7

git commit -m 'commit data' #forgin a file.

git add another_file # add the file.

git commit --amend # commit again.

Add Sina Weibo Support for Greyshade Theme of Octopress

Posted on Sep 10 2013   |   In Octopress   |   0 Comments

I am not familiar with CSS and ROR until now. It is not easy for me to add Sina Weibo support as the slidebar shows. So let me note it.

  • Firstly, add the following code to “octopress/_config.yml” file. Note that the weibo_user should be your weibo id, not your nickname.
1
2
3
4

# Weibo link
weibo_user: thankforyou

Behind of the following code:

1
2
3
4
5

# ----------------------- #
# 3rd Party Settings #
# ----------------------- #

  • Secondly, add the “weibo.png” to “octopress/source/images/social” dirctory.
  • Thirdly, add the following code to “octopress/sass/parts/_header.scss” file.
1
2
3
4
5
6
7
8
9
	
&.weibo{
background: image-url('social/weibo.png') center no-repeat #e32529;
border: 1px solid #e32529;
&:hover{
border: 1px solid darken(#e32529, 10%);
}
}

In front of the following code:

1
2
3
4
5
6
7
8
9
10
11
12
13
14
15
16
17
18
19
20
21
22
23
24

&.facebook{
background: image-url('social/facebook.png') center no-repeat #3B5998;
border: 1px solid #3B5998;
&:hover{
border: 1px solid darken(#3B5998, 10%);
}
}
&.google{
background: image-url('social/google.png') center no-repeat #C83D20;
border: 1px solid #C83D20;
&:hover{
border: 1px solid darken(#C83D20, 10%);
}
}
&.twitter{
background: image-url('social/twitter.png') center no-repeat #55CFF8;
border: 1px solid #55CFF8;
&:hover{
border: 1px solid darken(#55CFF8, 10%);
}
}
……

  • Fourthly, add the following code to “octopress/source/_includes/header.html” file.
1
2
3


Behind of the following code:

1
2
3
4
5

……
<nav id="sub-nav">
<div class="social">

Ok, have done.

[译]在IB中实现自动布局

Posted on Sep 9 2013   |   In Autolayout   |   0 Comments

有关自动布局的其他文章:

  • Autolayout
  • Visual format language for autolayout
  • Creating individual constraints

可怜的界面编辑器。它只能服从命令。苹果告诉它,它必须创建最简单的约束集并且简明的传递给你通过拖拽和调整控件大小所形成的布局中。系统约束集留给你的可能是这样的:

autolayout_nightmare

它也不一定非是上面的节奏。

在界面编辑器中快乐写约束的秘密其实很简单:告诉它你想要什么。只是拖拽控件是不够的。

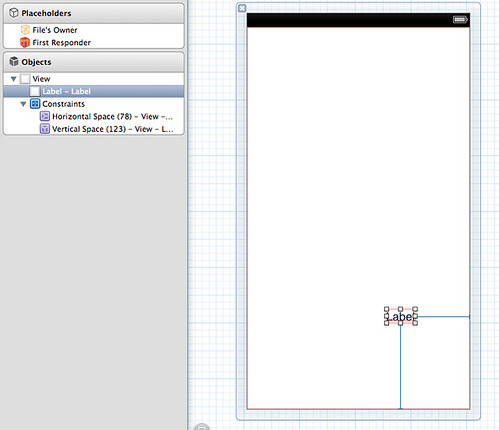
创建一个包含空View的.xib文件(File —> New File —> User Interface —> View),拖一个label放在View左上方的某个地方。IB将会为你创建一些约束:

label_top_left

现在,把这个label移动到右下方:

label_bottom_right

IB已经丢掉了之前自动创建的约束,重新创建了一组新约束。这个label现在会有不同的表现——比如说,在3.4寸和4寸iPhone屏上,它将会和屏幕底部保持相同的距离,而不是和屏幕顶部。这可能不是你想要的。

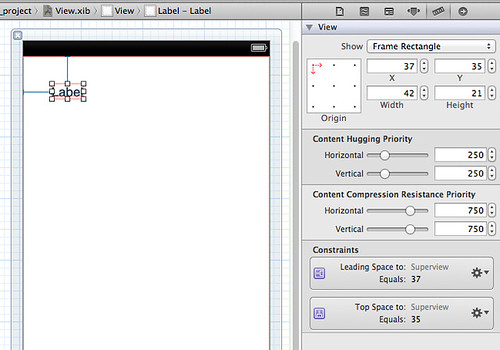
再次将label移回到左上角,开始给IB一些帮助。选择这个label,然后点击右边的“size inspector”图标:

size_inspector

这些影响label的约束出现了。点击这个“Top space to: Superview”约束上的设置图标,选择“Promote to user constraint”。它会改变颜色。兴奋之余,选择同一面板上的“Select and Edit”,把这个固定值改为比如400。这个label将会移动到屏幕底部,但是此时它的位置是相对于View顶部的,而不是底部。

然而,如果你再次拖拽这个label,IB认为你并不关心这个布局,它将会再次为你编造它自己的约束。

不要拖拽视图去调整布局,而是创建适当的约束。

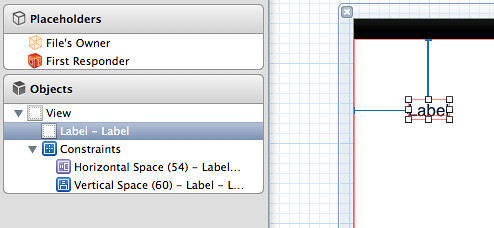
被你提升或者说编辑的约束叫做用户约束,它在文档浏览器里会显示成蓝色,并且会比较粗。通过拖拽被IB自动增加的约束叫做系统约束,比较细一点。这里你能看出两种不同约束的区别:

user_and_system_constraints

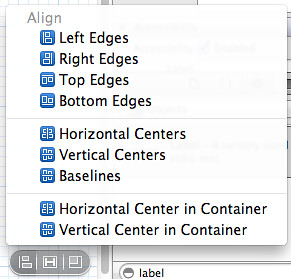
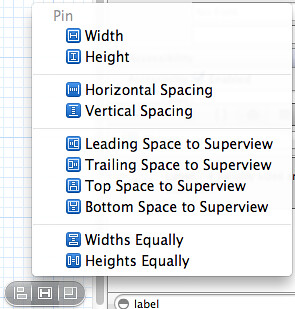
拖拽的方法是创建约束的一种方式,但是是最坏的一种方式。因为我们依赖IB为我们做出正确的猜想,什么才是我们想要的。你完全可以控制所有的约束的创建通过“Alignment and Pinning”面板:

在这个Alignment面板中,如果你在编辑器中没有选择多个视图,那除了最下面的两个选项外,其他的选项都是不可选的。注意在每一种约束前面的小图标,这些小图标很好的描叙了对应约束的作用,它们在查看复杂布局的适合很有用。

在这个“Pinning”面板中,这些“Horizontal”,“Vertical Spacing”,“Widths Equally“和“Heights Equally”选项仅仅在选择多个视图的情况下才可使用。再一次,请注意这些描叙性的图标。

“Pinning”和“Alignment”面板创建的约束相对于拖拽得到的约束,给了你更多的控制权。

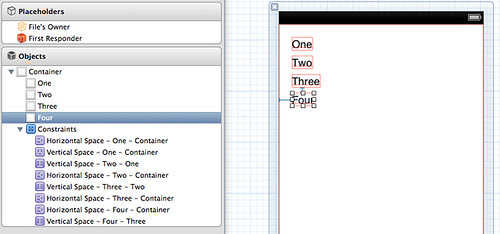
对于复杂的布局,确保你在早期有一个清晰的想法将是成功的关键。不如说,你有一组label,你想让它们左边界对齐,并且距离父视图有十个像素点。拖拽将会给你正确的布局,但是不会创建对齐的约束:

aligned_labels_1

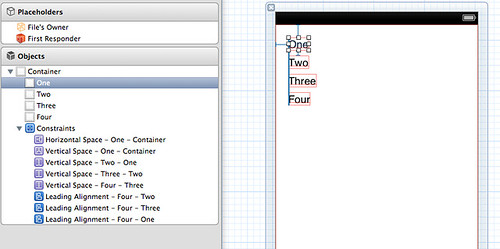
所有的水平位置的约束都是相对于父视图的。如果你想一起移动这些label,不管是在IB中还是在程序运行中,你都需要改变每一个label的约束。当然,你也可以通过全选这些label,通过这个面板对齐它们的左边界。

现在有一个单独的间隔约束指向父视图的左边界。编辑这个约束将会移动所有label的位置。

对于有清晰想法的布局,要通过“alignment and pinning”面板创建约束,而不是通过拖拽创建。

正如我们清楚我们想要什么,我们也必须清楚哪些是我们不想要的。在创建或者提升那些我们关心的约束之后,我们要迅速的移除那些剩余的约束。IB会帮你移除一些,但是你的目的是全部使用你自己创建或提升的用户约束,而不留下系统约束。如果你不这样做,当视图在程序运行中改变,将会因为布局管理器使用那些多余的约束而产生不必要的影响。

为了达到100%的用户约束——在你布局中用到的每一个约束,都要保证是你想要的且理解的那个。

选择,编辑和删除约束可以在三个不同的地方操作:

  1. 在文档导航里

    在这里,将你的视图命名是非常有帮助的。约束可以在它应用的视图下面找到。注意,一个视图的位置是一个在它父视图上面约束(因为这个约束影响frame),视图的大小则是一个在它自身上面的约束(因为这个约束影响bounds)。

    在IB中将视图命名对于约束很有帮助。也可以在“identity inspector”中的“Label”处命名。

  2. 在布局中

    这需要技巧,依赖于展示约束的数量。首先,点击你感兴趣的视图,然后点击那一两个像素宽的指示器。

  3. 在“size inspector”中指定的部分

    这一列包含大小约束和位置约束。“Select and edit”选项和在其他地方选择约束,打开其“attributes inspector”一样。

    在约束的“attributes inspector”选项中,你能够编辑它的优先级。对于大小约束和间隔约束,有小于等于,等于,大于等于和常量等关系。

通过按照我在文章中突出强调的关键点,你现在应该能够通过IB管理你的约束了。作为总结:

  • 不要通过拖拽视图去调整布局,而是编辑合适的约束。
  • 有清晰的目的,使用“alignment and pinning”面板去创建约束而不是通过拖拽。
  • 为了达到100%的用户约束——在你布局中用到的每一个约束,都要保证是你想要的且理解的那个。
  • 在IB中将视图命名对于约束很有帮助。也可以在“identity inspector”中的“Label”处命名。

翻译出处:Autolayout in Interface Builder

Sep 1-7,2013 All Activities

Posted on Sep 9 2013   |   In Activities   |   0 Comments


RescueTime: Project Time Tracking Software
& Team Time Management Software


<!– a little how-to

  • Paste this into your web page where you want the chart.
  • You may have multiple embedded charts on the same page.
  • You can change the title, width and height by editing the named properties.
  • You can opt for the more verbose full chart by setting .kind to ‘default’.
  • If you want your own css control, you can add ‘rtapi.my_css = true;’ before the render function.
  • css class names are:
  • rtdiv : the whole container
  • rttitle : the title, rtchart : the chart, rtfeed : the footer
    –>

How to Export Mp3 From Ipod-Library

Posted on Jun 4 2013   |   In iOS ipod-library   |   1 Comment

Someday, our leader let me export videos, music and photos from Video, Music and Photos in iPad or iPhone. After looked up some articles, I found it was difficult to export mp3.

But, Nowadays, it came true to export mp3, so every format of ipod-library files can be exported.

Now, See how to do it.

  • first, import some frameworks, such as MobileCoreServices.framework,MediaPlayer.framework,AVFoundation.framework
  • second, query the media from ipod-library.

    //request videos and music come from system's Videos and Music 
    NSNumber *videoTypeNum = [NSNumber numberWithInteger:MPMediaTypeAny];
    
    MPMediaPropertyPredicate *videoPredicate = [MPMediaPropertyPredicate predicateWithValue:videoTypeNum forProperty:MPMediaItemPropertyMediaType];
    
    MPMediaQuery *videoQuery = [[MPMediaQuery alloc] init];
    [videoQuery addFilterPredicate: videoPredicate];
    _mediaItems = [[videoQuery items] copy];
    

*third, convert MPMediaItem to AVURLAsset, generate file name and file extension, then start export,the format of exported file is “MOV”.Finally, i need use NSFileManager rename the mov to mp3.

 MPMediaItem *mediaItem = [_mediaItems objectAtIndex:_count];

 //get the name of the file.
 NSString *songTitle = [mediaItem valueForProperty: MPMediaItemPropertyTitle];

 //convert MPMediaItem to AVURLAsset.
 AVURLAsset *sset = [AVURLAsset assetWithURL:[mediaItem valueForProperty:MPMediaItemPropertyAssetURL]];

//get the extension of the file.
NSString *fileType = [[[[sset.URL absoluteString] componentsSeparatedByString:@"?"] objectAtIndex:0] pathExtension];

//init export, here you must set "presentName" argument to "AVAssetExportPresetPassthrough". If not, you will can't export mp3 correct.
AVAssetExportSession *export = [[AVAssetExportSession alloc] initWithAsset:sset presetName:AVAssetExportPresetPassthrough];

NSLog(@"export.supportedFileTypes : %@",export.supportedFileTypes);
//export to mov format.
export.outputFileType = @"com.apple.quicktime-movie";

export.shouldOptimizeForNetworkUse = YES;

NSString *extension = ( NSString *)UTTypeCopyPreferredTagWithClass(( CFStringRef)export.outputFileType, kUTTagClassFilenameExtension);

NSLog(@"extension %@",extension);
NSString *path = [NSHomeDirectory() stringByAppendingFormat:@"/Documents/%@.%@",songTitle,extension];

NSURL *outputURL = [NSURL fileURLWithPath:path];
export.outputURL = outputURL;
[export exportAsynchronouslyWithCompletionHandler:^{

   if (export.status == AVAssetExportSessionStatusCompleted)
     {
        //then rename mov format to the original format.
         NSFileManager *manage = [NSFileManager defaultManager];

         NSString *mp3Path = [NSHomeDirectory() stringByAppendingFormat:@"/Documents/%@.%@",songTitle,fileType];

         NSError *error = nil;

         [manage moveItemAtPath:path toPath:mp3Path error:&error];

         NSLog(@"error %@",error);

      }
      else
      {
         NSLog(@"%@",export.error);
      }

}];

Some points you need notice:

  • when you init AVAssetExportSession object, the “presetName” argument must be “AVAssetExportPresetPassthrough”.
  • The “outputFileType” may be “com.apple.quicktime-movie”.

So easy, doesn’t it? Good night.

The Replacement of the Semaphore

Posted on May 24 2013   |   In GCD iOS   |   0 Comments

In order to synchronize between threads, i used semaphore in here. Today, I find a replacement of the semaphore. I think it is more efficient and cool. Now, i note it as follow:

    - (id)initWithLibraryChangedHandler:(void (^)(void))libraryChangedHandler
{
    self = [super init];
    if (self) 
    {
        _assetItems = [NSMutableArray array];
        //Creates a new dispatch queue to which blocks can be submitted.  创建一个新的分发队列用于提交blocks
        _assetItemsQueue = dispatch_queue_create("com.apple.avmovieexporter.assetItemLibraryQueue", DISPATCH_QUEUE_SERIAL);

        _libraryGroup = dispatch_group_create();
        //Returns a well-known global concurrent queue of a given priority level.
        //The well-known global concurrent queues cannot be modified
        //Blocks submitted to these global concurrent queues may be executed concurrently with respect to each other.
        _libraryQueue = dispatch_get_global_queue(DISPATCH_QUEUE_PRIORITY_BACKGROUND, 0);

        // Update the table view whenever the library changes
        [[NSNotificationCenter defaultCenter] addObserverForName:ALAssetsLibraryChangedNotification 
                                                          object:nil 
                                                           queue:[NSOperationQueue mainQueue] 
                                                      usingBlock:^(NSNotification *block){
                                                               libraryChangedHandler();
                                                           }];
    }

    return self;
}

- (void)dealloc
{
    dispatch_release(_assetItemsQueue);

    dispatch_release(_libraryQueue);
    dispatch_release(_libraryGroup);

    [[NSNotificationCenter defaultCenter] removeObserver:self name:ALAssetsLibraryChangedNotification object:nil];
}

- (void)loadLibraryWithCompletionBlock:(void (^)(void))completionHandler
{
    // Load content using the Media Library and AssetLibrary APIs, also check for content included in the application bundle
    [self.assetItems removeAllObjects];

    [self buildMediaLibrary];
    [self buildAssetLibrary];
    [self buildApplicationBundleLibrary];


    //Schedules a block object to be submitted to a queue when a group of previously submitted block objects have completed.
    dispatch_group_notify(self.libraryGroup, self.libraryQueue, ^{
        dispatch_async(dispatch_get_main_queue(), ^{
            completionHandler();
        });
    });
}

- (void)addURL:(NSURL *)url
{
    __unsafe_unretained __block VideoLibrary *weakSelf = (VideoLibrary *)self;

    if (url == nil)
        return;

    dispatch_async(self.assetItemsQueue, ^{
        [weakSelf.assetItems addObject:[[AssetItem alloc] initWithURL:url]];
    });
}

#pragma mark - iPod Library

- (void)buildMediaLibrary
{
    __unsafe_unretained __block VideoLibrary *weakSelf = (VideoLibrary *)self;

    //将blocks绑定到libraryGroup,然后放在libraryQueue并发队列中
    dispatch_group_async(self.libraryGroup, self.libraryQueue, ^{
        NSLog(@"started building media library...");

        // Search for video content in the Media Library
#if  __IPHONE_OS_VERSION_MAX_ALLOWED >= 50000
        NSNumber *videoTypeNum = [NSNumber numberWithInteger:MPMediaTypeAnyVideo];
#else
        NSNumber *videoTypeNum = [NSNumber numberWithInteger:(MPMediaTypeAny ^ MPMediaTypeAnyAudio)];
#endif
        MPMediaPropertyPredicate *videoPredicate = [MPMediaPropertyPredicate predicateWithValue:videoTypeNum forProperty:MPMediaItemPropertyMediaType];
        MPMediaQuery *videoQuery = [[MPMediaQuery alloc] init];
        [videoQuery addFilterPredicate: videoPredicate];
        NSArray *items = [videoQuery items];

        for (MPMediaItem *mediaItem in items) 
            [weakSelf addURL:[mediaItem valueForProperty:MPMediaItemPropertyAssetURL]];

        NSLog(@"done building media library...");
    });
}

- (void)buildAssetLibrary
{
    NSLog(@"started building asset library...");

    __unsafe_unretained __block VideoLibrary *weakSelf = (VideoLibrary *)self;
    dispatch_group_enter(weakSelf.libraryGroup);

    ALAssetsLibrary *assetLibrary = [[ALAssetsLibrary alloc] init];

    // Enumerate through all the groups in the Asset Library
    [assetLibrary enumerateGroupsWithTypes:ALAssetsGroupAll 
                                usingBlock:
     ^(ALAssetsGroup *group, BOOL *stop)
     {
         if (group != nil)
         {
             // Filter by groups that contain video
             [group setAssetsFilter:[ALAssetsFilter allVideos]];
             [group enumerateAssetsUsingBlock:
              ^(ALAsset *asset, NSUInteger index, BOOL *stop)
              {
                  if (asset)
                      [weakSelf addURL:[[asset defaultRepresentation] url]];
              }];
         }
         else
         {
             dispatch_group_leave(weakSelf.libraryGroup);
             NSLog(@"done building asset library...");
         }
     }
                              failureBlock:^(NSError *error)
     {
         dispatch_group_leave(weakSelf.libraryGroup);
         NSLog(@"error enumerating AssetLibrary groups %@\n", error);
     }];

}

The above is used for understanding the whole plot, now you can see the detail:

dispatch_group_notify(self.libraryGroup, self.libraryQueue, ^{
        dispatch_async(dispatch_get_main_queue(), ^{
            completionHandler();
        });
    });
}

The explain of the document for the selector is that “Schedules a block object to be submitted to a queue when a group of previously submitted block objects have completed.” So, we can wait the tasks to complete, then to do something we want. The dispatch_group_enter is cool as well. it can let the block enter the queue and execute as a task associated group.

So, that is all. See you.

Localize Strings Using Some Utilities

Posted on Apr 20 2013   |   In Localize   |   0 Comments

When release applications, one thing will not be avoided, it is localizing. According to the different user demands, we can divide them into Set language through Settings and Set language inside App

###Set language through Settings

The user demand is easier than another one, when we change language by “Settings -> General -> international”, all applications will restart. So, the .strings file will be loaded again and the language is changed.

Now, let’s see how to do it.

  • Use the macro NSLocalizedString(@"user_label_text", nil); to wrap your strings.
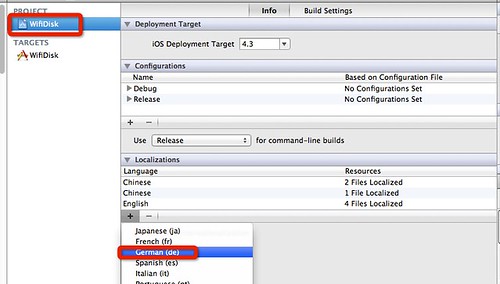
  • Add one kind of language to project as follow, Xcode will generate a forder named language-lproj.
    412C868B-805A-405A-B5FB-B8F4FB0B96CC
  • Use the commend tool genstrings to generate Localizable.strings file.

    genstrings *m -a -o  language-lproj
    
  • Change the value of the key for different language.

    "user_label_text" = "用户登陆"
    

The game seems over, but it is not true. The genstrings commend either replaces your earily changes, or just follows the changes, does not merge them. This is boring.

So what can i do? You know, we do not be defeated by Ants. Some advice as follows:

  1. Localizable Strings Merge needs $4.99.
  2. AGi18n free and can auto convert strings in xib.
  3. my shells.

    localizedstring.sh

    #!/bin/sh
    echo "input the language you want localize:"
    read language
    echo $language
    desFilePath=$PWD/"$language".lproj/Localizable.strings
    echo des file path is:"$desFilePath"
    if [ ! -e $desFilePath ] ; then
        echo "des file doed not exit, touch it."
        touch $desFilePath
    fi
    tmpDir=$PWD/"$language".lproj/tmp
    tmpFile="$tmpDir"/Localizable.strings
    tmpFile1="$tmpDir"/Localizable1.strings
    
    rm -rf $tmpDir
    mkdir $tmpDir
    touch $tmpFile1
    find . -name '*.m' | xargs genstrings -macRoman -a -o  $tmpDir
    find . -name '*.mm' | xargs genstrings -macRoman -a -o  $tmpDir
    iconv -f utf-16le  -t utf-8 $tmpFile > $tmpFile1
    chmod 755 loop.sh
    echo  tempfile=$tmpFile1
    echo des=$desFilePath
    ./loop.sh $tmpFile1 $desFilePath
    
loop.sh

    #!/bin/sh  
    echo 1=$1
    echo 2=$2
    SRC=$1
    DES=$2
    if [ $# -ne 2 ] ; then
        echo Usage: loop.sh src des
        exit 1
    fi
    echo arg OK
    while read line; do
        #line is NULL
    #echo line=$line
        if [ "$line" == "" ] ; then
            echo $line >> $2
            continue
        fi    
        equal=`echo $line|grep "="`
        if [ "$equal" == "" ] ; then
            echo "$line" >> $2
            continue
        fi    
        left=`echo $line| cut -d "=" -f1`
        num=`cat $2|grep "$left"|wc -l`
    #echo num=$num
    #    sleep 1
        if [ $num -eq 0 ]; then
    #   echo "$line insert $2 !!!!!!!!!!!!"
            echo $line >> $2
        fi
    done < $SRC
  1. Lin can reduce workload for you.

###Set language inside App

For this, we need an Object to load stings information real-time.

LanguageHelper.h

#import <Foundation/Foundation.h>
#define CustomLocalizedString(str,comment) [LanguageHelper  get:str alter:nil]
@interface LanguageHelper : NSObject

+(void)initialize;
+(void)setLanguage:(NSString *)lan;
+(NSString *)get:(NSString *)key alter:(NSString *)alternate;

/* @brief 返回当前语言
 * @return 返回当前设置的语言
 */
+(NSString *)currentLanguage;
@end

LanguageHelper.m

#import "LanguageHelper.h"

@implementation LanguageHelper

static NSBundle *bundle = nil;

+(void)initialize {


    NSUserDefaults* defs = [NSUserDefaults standardUserDefaults];
    NSString *current = @"";
    if ([defs valueForKey:@"userLanguage"])
    {
        current = [defs valueForKey:@"userLanguage"];
    }
    else
    {
        NSArray* languages = [defs objectForKey:@"AppleLanguages"];
        current =[languages objectAtIndex:0];


        NSArray *supportLanguage = [[NSBundle mainBundle] objectForInfoDictionaryKey:@"SupportedLanguage"];
        if (![supportLanguage containsObject:current])
        {
            current = [[NSBundle mainBundle] objectForInfoDictionaryKey:@"DefaultLanguage"];
        }
        [defs setValue:current forKey:@"userLanguage"];
        [defs synchronize];
    }

    [self setLanguage:current];

}
+(void)setLanguage:(NSString *)lan {
    NSLog(@"preferredLang: %@", lan);
    NSString *path = [[ NSBundle mainBundle ] pathForResource:lan ofType:@"lproj" ];
    bundle = [NSBundle bundleWithPath:path];
}

+(NSString *)get:(NSString *)key alter:(NSString *)alternate {
    return [bundle localizedStringForKey:key value:alternate table:nil];
}

+(NSString *)currentLanguage{
    NSUserDefaults* defs = [NSUserDefaults standardUserDefaults];

    return [defs objectForKey:@"userLanguage"];
}

@end

First, we need replace NSLocalizable(string,commit) to CustomLocalizable(string,commit), then when the app initializes, we call the method +(void)initialize, when we change another language, we call the method +(void)setLanguage:(NSString *)lan, then we reload the data on views, the function come true.

###Attention!!!
Today, the earthquake attracked YaAn. They need our help, you can donate money through 壹基金, God blesses YaAn and us.

1…5678
Changwei

Changwei

I develop iOS/Android apps with Swift/Kotlin language.

80 posts
33 categories
34 tags
GitHub Twitter Weibo Linkedin Upwork peopleperhour
Creative Commons
© 2011 - 2020 Changwei
Powered by Hexo
Theme - NexT.Muse