Senior Mobile Developer - Vale

Contact me via @cwtututu.


  • Home

  • Categories

  • Archives

  • Tags

  • About

[Vapor4.0]deploy App on Server

Posted on Apr 23 2020   |   In Vapor4.0   |  

Just record the steps how I deploy my vapor project on the server.

Step 1: Install Docker

1
2
curl -fsSL get.docker.com -o get-docker.sh
sh get-docker.sh

Step2: Start Docker

1
2
3
4
sudo systemctl enable docker
sudo systemctl start docker
sudo groupadd docker
sudo usermod -aG docker $USER

Step3: Install docker compose

1
2
3
sudo curl -L https://github.com/docker/compose/releases/download/1.25.5/docker-compose-`uname -s`-`uname -m` -o /usr/local/bin/docker-compose
sudo chmod +x /usr/local/bin/docker-compose
docker-compose --version

Step4: copy the source code into the server.

1
scp Dreamoji-server root@144.202.101.94:~

Step5: unzip the source code.

1
2
apt install unzip
unzip Dreamoji-server.zip

Step6: build & run

1
2
3
cd Dreamoji-server
docker-compose build
docker-compose up app

[Vapor 4.0]Updating Field by Adding Unquie Constraint Doesn't Work

Posted on Apr 6 2020   |  

So today I wanted to add an unique constraint to my ArticleCategory table, but it doesn’t work, my code:

1
2
3
4
5
6
7
8
9
10
11
struct ModifyNameToCategory: Migration {
func prepare(on database: Database) -> EventLoopFuture<Void> {
return database.schema(ArticleCategory.schema)
.unique(on: ArticleCategory.nameKey)
.update()

}
func revert(on database: Database) -> EventLoopFuture<Void> {
...
}
}

The error:

1
2
3
4
5
[ INFO ] query read _fluent_migrations
[ INFO ] query read _fluent_migrations limits=[count(1)]
[ ERROR ] syntax error at end of input (scanner_yyerror)
[ ERROR ] server: syntax error at end of input (scanner_yyerror)
Fatal error: Error raised at top level: server: syntax error at end of input (scanner_yyerror): file /AppleInternal/BuildRoot/Library/Caches/com.apple.xbs/Sources/swiftlang/swiftlang-1103.8.25.8/swift/stdlib/public/core/ErrorType.swift, line 200

By reading the source code, I found this because the fluent-kit didn’t add handling for the update action to add constraint. But it does have handing for create action to add constraint. Please see the issue detail I submitted.

So what we can do now? Luckly, we can use the old way:

1
2
3
4
5
6
7
8
9
10
11
12
13
14
15
16
17
18
19
20
21
22
23
24
25
26
27
import Foundation
import Fluent
import FluentSQL
import FluentPostgresDriver
struct ModifyNameToCategory: Migration {
func prepare(on database: Database) -> EventLoopFuture<Void> {
/*
//Because the Fluent kit didn't implement this feature, so we need to run the sql raw.
return database.schema(ArticleCategory.schema)
.unique(on: ArticleCategory.nameKey)
.update()
*/
let psgl = database as! PostgresDatabase
let sql = "ALTER TABLE \(ArticleCategory.schema) ADD CONSTRAINT name_unique UNIQUE (\(ArticleCategory.nameKey))"
print(sql)
return psgl.query(sql)
.transform(to: ())

}
func revert(on database: Database) -> EventLoopFuture<Void> {
let psgl = database as! PostgresDatabase
let sql = "ALTER TABLE \(ArticleCategory.schema) DROP CONSTRAINT name_unique"
print(sql)
return psgl.query(sql)
.transform(to: ())
}
}

Don’t forget to import FluentSQL and FluentPostgresDriver

[Vapor 4.0]Set Environment Variables for Swift Test and Github Action

Posted on Apr 5 2020   |   In Vapor4.0   |  

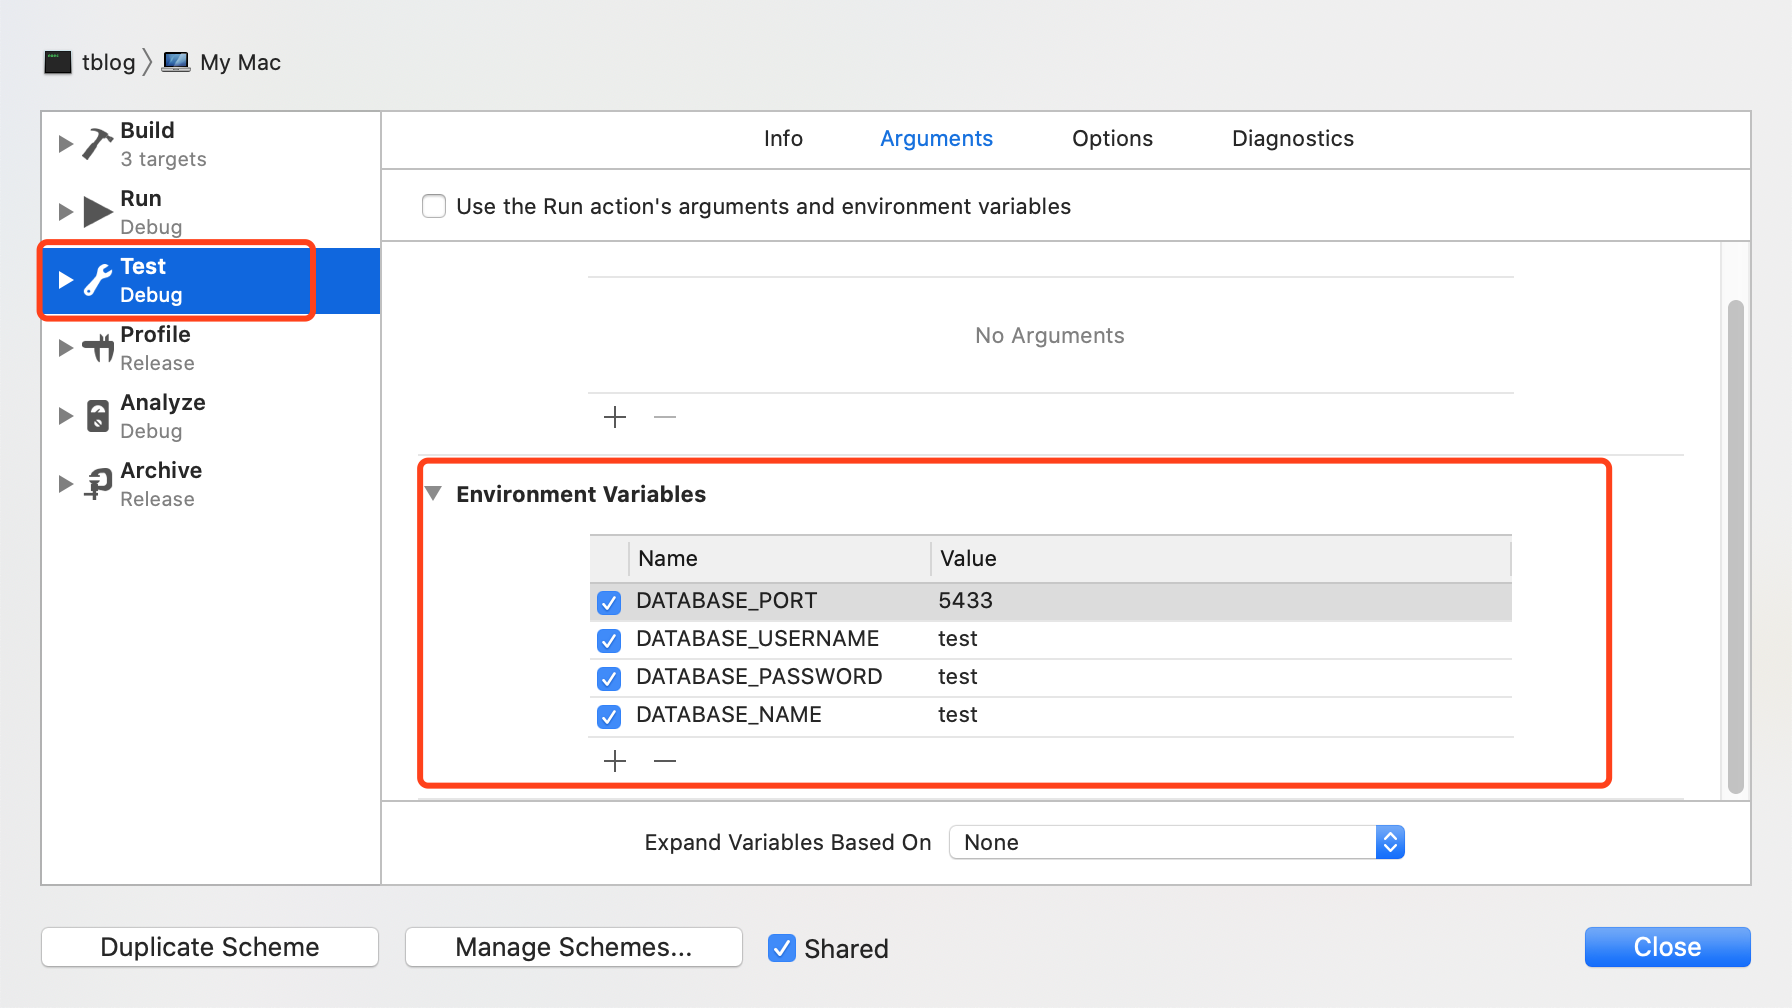
When we run test casts, we don’t want to use our development database, we want to use a new database for testing. In Xcode, it is easy to set. Under the Run tab, we don’t set the database information, but under the Test tab, we do.

But do you know how to set these variables via command line? Here it is:

1
export DATABASE_PORT="5433"; export DATABASE_USERNAME="test"; export DATABASE_PASSWORD="test"; export DATABASE_NAME="test"; swift test

If you want to cancel setting, you need to close your terminal window and open it again.

Now, CI(continutal Integration) is popular, today I also try to run test when I push my code to Github reposity. After some failture, here is the right yml file.

1
2
3
4
5
6
7
8
9
10
11
12
13
14
15
16
17
18
19
20
21
22
23
24
25
26
27
28
29
name: test
on:
push:
jobs:
test:
container:
image: vapor/swift:5.2
services:
psql:
image: postgres
ports:
- 5432:5432
env:
POSTGRES_USER: test
POSTGRES_DB: test
POSTGRES_PASSWORD: test
runs-on: ubuntu-latest

steps:
- name: 'Checking out repo'
uses: actions/checkout@v2
- name: 'Running Integration Tests'
run: swift test --enable-test-discovery --sanitize=thread
env:
DATABASE_PORT: 5432
DATABASE_USERNAME: test
DATABASE_PASSWORD: test
DATABASE_NAME: test
DATABASE_HOST: psql

I had thought to change the database port to 5433, but it seems a bug of Github Action. After I changed it back to 5432, it works.

Thanks to @0xTim for discussion about it.

[Vapor 4.0]How to Write Test Cases to Test Routes That Render Model to Leaf Page

Posted on Apr 4 2020   |  

You want to write test cases for every route right? Yes, I want too. But today, I met a question - How to write test cases to test routes that render model to Leaf page?

We all know testing html is complicated, I want to test the model which will be rendered to the html page, but how?

Let’s see the answer.

First, we need to write our ViewRender, we want to use the custom ViewRender to get the model before it is rendered to html page.

1
2
3
4
5
6
7
8
9
10
11
12
13
14
15
16
17
18
19
20
21
22
23
24
import Vapor
class CapturingViewRenderer: ViewRenderer {
var shouldCache = false
var eventLoop: EventLoop
init(eventLoop: EventLoop) {
self.eventLoop = eventLoop
}

func `for`(_ request: Request) -> ViewRenderer {
return self
}

private(set) var capturedContext: Encodable?
private(set) var templatePath: String?
func render<E>(_ name: String, _ context: E) -> EventLoopFuture<View> where E : Encodable {
self.capturedContext = context
self.templatePath = name
let string = "I just want to get the context and the templatePath, I don't care what the view will look like"
var byteBuffer = ByteBufferAllocator().buffer(capacity: string.count)
byteBuffer.writeString(string)
let view = View(data: byteBuffer)
return eventLoop.future(view)
}
}

You see, we get the rendering destination templatePath, and the context capturedContext. Maybe you don’t know what context is, just see the route hander, you will undertand.

1
2
3
4
5
func getArticlesHandler(req: Request) throws -> EventLoopFuture<View> {
return Article.query(on: req.db).all().flatMap {
return req.view.render("Home", HomeContext(articles: $0))
}
}

The HomeContext is the Context the Leaf framework needs, it wraps our model.

Second, we need to register the ViewRender to our app.

1
2
3
4
5
6
7
8
9
10
11
12
13
14
15
final class ArticleRoutesTests: XCTestCase {
var app: Application!
let url = "/articles"
let articleName = "Swift"
let articleBody = "This is my first post"
var capturingViewRender: CapturingViewRenderer!

override func setUpWithError() throws {
app = Application(.testing)
try configure(app)
capturingViewRender = CapturingViewRenderer(eventLoop: app.eventLoopGroup.next())
app.views.use {_ in self.capturingViewRender }
}
...
}

Third, write the test case to compare the route path and model.

1
2
3
4
5
6
7
8
9
10
11
12
func testGetArticles() throws {
try Utils.cleanDatabase(db: app.db)
let article = Article(name: articleName, body: articleBody)
try article.save(on: app.db).wait()
try app.test(.GET, url) { res in
let context = try XCTUnwrap(capturingViewRender.capturedContext as? ArticleController.HomeContext)
XCTAssert(capturingViewRender.templatePath == "Home", "render to wrong page")
XCTAssertTrue(context.articles?.count == 1, "GET /articles api failed.")
XCTAssertTrue(context.articles?.first?.name == articleName, "GET /articles api failed.")
XCTAssertTrue(context.articles?.first?.body == articleBody, "GET /articles api failed.")
}
}

Done! Enjoy testing.

Thanks to @0xTim for discussion about it.

Vapor4.0发送Post及Leaf渲染

Posted on Apr 1 2020   |  

今天填了两个坑。

1, Post 创建文章。Article database Model结构为:

1
2
3
4
5
6
7
8
9
10
11
12
13
14
15
16
17
18
19
20
21
22
23
24
25
26
27
28
29
30
31
32
33
34
35
36
37
38
39
40
41
final class Article: Model, Content {
static var schema: String = "articles"
static var idKey: FieldKey = .id
static var nameKey: FieldKey = "name"
static var slugKey: FieldKey = "slug"
static var bodyKey: FieldKey = "body"
static var categoryIDKey: FieldKey = "category_id"
static var createdKey: FieldKey = "created_at"
static var updatedKey: FieldKey = "updated_at"

@ID(key: idKey)
var id: UUID?

@Field(key: nameKey)
var name: String

@Field(key: slugKey)
var slug: String?

@Field(key: bodyKey)
var body: String

@OptionalParent(key: categoryIDKey)
var category: ArticleCategory?

@Timestamp(key: createdKey, on: .create)
var createdAt: Date?

@Timestamp(key: updatedKey, on: .update)
var updatedAt: Date?

init() {
}
init(name: String, body:String, categoryID: UUID? = nil) {
self.name = name
self.body = body
self.$category.id = categoryID
self.slug = "\(Date().formatedString())\(name.split(separator: " ").joined(separator: "-"))"
}

}

在Article database model中, 我创建了一个父关系category, 但这个项目中,我并不打算让每篇文章都有一个类别,所以我把父关系设置为可选类型。但是post的时候并不能把category这个字段省略,请求的格式必须这样:

1
2
3
4
5
{
"body": "Hello, my first blog.",
"category": {},//或者 "category": { "id": null },
"name": "my first blog"
}

是不是很不合理?前端拿到这个API会比较迷惑,组建json的时候,这个字段没有值,不能不写这个key-value pair, 也不能写成category:null 。社区中大神给出的方案是用一个不含category字段的结构体先接收,然后再转成database mode的样子。具体解释请参考这里

2, Leaf渲染。Vapor4的文档还没有出,Leaf的定义也与Vapor3有很大的改变,这就难为死我了。这种情况下,只能去扒一扒Test里面写的测试用例了。坑如下:

1
2
3
4
5
6
7
8
9
<p>#(title)</p>
#if(!articles.isEmpty):
<p>#(title)</p>
#for(article in articles):
<p>#(article)</p>
#endfor
#else:
<p>no artcile</p>
#endif

遍历打印文章是打印不到的。必须是打印文章的属性,如下写法是正确的:

1
2
3
4
5
6
7
8
9
<p>#(title)</p>
#if(!articles.isEmpty):
<p>#(title)</p>
#for(article in articles):
<p>#(article.name)</p>//<--注意这里
#endfor
#else:
<p>no artcile</p>
#endif

填坑完毕。

Vapor4.0数据库增加字段

Posted on Mar 31 2020   |  

Question is following: How to implement additional migration on already existing table without revert or recreating DB?
Original migration:

1
2
3
4
5
6
7
8
9
10
11
12
13
14
15
16
struct CreateTile: Migration {
// Prepares the database for storing Tile models.
func prepare(on database: Database) -> EventLoopFuture<Void> {
database.schema("tiles")
.id()
.field("x", .int, .required)
.field("y", .int, .required)
.field("z", .int, .required)
.create()
}

// Optionally reverts the changes made in the prepare method.
func revert(on database: Database) -> EventLoopFuture<Void> {
database.schema("tiles").delete()
}
}

Now you want to extend the table by additional column called new which is of type Int. Therefore you have to implement new migration.

1
2
3
4
5
6
7
8
9
10
11
12
13
struct UpdateTile: Migration {
// Prepares the database for storing Tile models.
func prepare(on database: Database) -> EventLoopFuture<Void> {
database.schema("tiles")
.field("new", .int)
.update()
}

// Optionally reverts the changes made in the prepare method.
func revert(on database: Database) -> EventLoopFuture<Void> {
database.schema("tiles").deleteField("new").update()
}
}

Last step is to register your new migration in configure.swift file similar as the original one

Vapor4.0写一些测试

Posted on Mar 24 2020   |   In Vapor4.0   |  

没有文档的情况下,一切都靠摸索。刚开始的时候都不知道怎么下手,看看Vapor的测试怎么写,看看Fluent的测试怎么写。万事开头难,总算摸出个头绪。

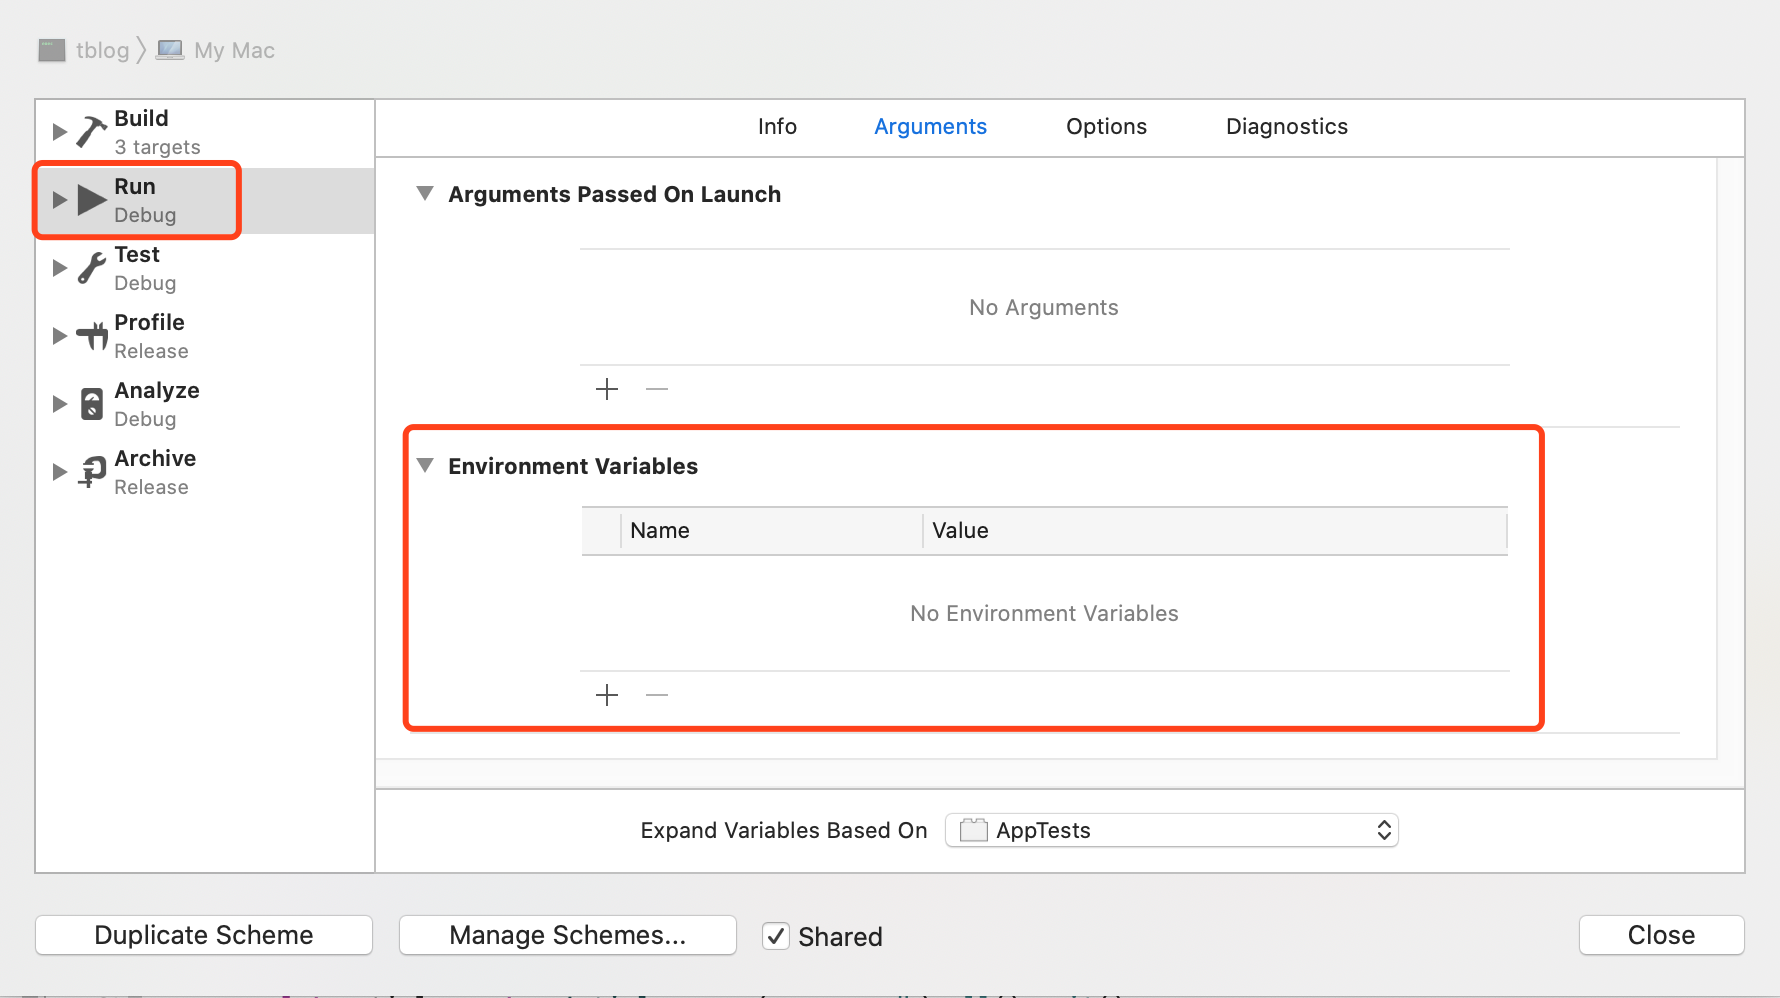
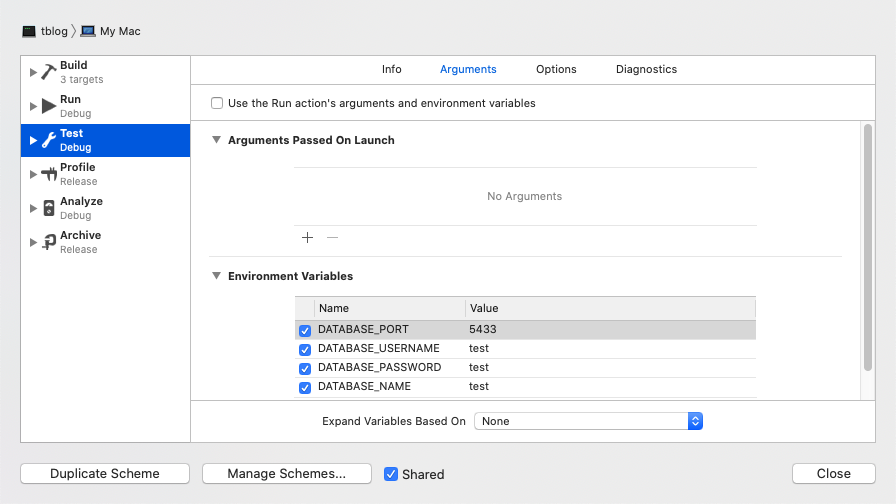
首先,要配置测试环境, 在Xcode中的配置如下。

然后新建测试数据库。

1
2
3
docker run --name postgres-test -e POSTGRES_DB=test \
-e POSTGRES_USER=test -e POSTGRES_PASSWORD=test \
-p 5433:5432 -d postgres

测试一下:

1
2
3
4
5
6
7
8
9
func testDatabaseConfig() throws {
let app = Application(.testing)
defer { app.shutdown() }
try configure(app)
XCTAssertTrue(Int(Environment.get("DATABASE_PORT") ?? "5432")! == 5433, "DATABASE_PORT is wrong")
XCTAssertTrue(Environment.get("DATABASE_USERNAME") == "test", "DATABASE_USERNAME is wrong")
XCTAssertTrue(Environment.get("DATABASE_PASSWORD") == "test", "DATABASE_PASSWORD is wrong")
XCTAssertTrue(Environment.get("DATABASE_NAME") == "test", "DATABASE_PASSWORD is wrong")
}

测试新建表格是否成功:

1
2
3
4
5
6
7
8
9
10
11
12
13
func testArticleTable() throws {
let app = Application(.testing)
defer { app.shutdown() }
try configure(app)
let article = Article(name: "title", body: "body", categoryID: nil)
try article.save(on: app.db).wait()
let articles = try Article.query(on: app.db).all().wait()
XCTAssertEqual(articles.count, 1)
XCTAssertEqual(articles.first?.name, "title")
XCTAssertEqual(articles.first?.body, "body")
XCTAssertNil(articles.first?.category)

}

其中在configure.swift文件中加入一些辅助方法调用,使测试之前清空数据库。

1
2
3
4
5
6
7
8
9
10
11
12
13
14
15
16
17
18
19
20
21
22
23
24
25
26
public func configure(_ app: Application) throws {
// uncomment to serve files from /Public folder
app.middleware.use(FileMiddleware(publicDirectory: app.directory.publicDirectory))

app.databases.use(.postgres(
hostname: Environment.get("DATABASE_HOST") ?? "localhost",
port: Int(Environment.get("DATABASE_PORT") ?? "5432") ?? 5432,
username: Environment.get("DATABASE_USERNAME") ?? "vapor_username",
password: Environment.get("DATABASE_PASSWORD") ?? "vapor_password",
database: Environment.get("DATABASE_NAME") ?? "vapor_database"
), as: .psql)

app.migrations.add(CreateArticleGategory())
app.migrations.add(CreateArticle())
//<==如果是测试环境,则清空数据库。注意这三行代码的位置要放在add方法之下的。
if app.environment == .testing {
try app.autoRevert().wait()
try app.autoMigrate().wait()
}

//开启页面渲染
app.views.use(.leaf)
app.leaf.cache.isEnabled = false
// register routes
try routes(app)
}

Vapor4.0加入数据库

Posted on Mar 20 2020   |   In Vapor4.0   |  

今天主要是操作postgres数据库,验证表关系,主要测试联机删除和外键为空的情况。

数据库中建了文章表(子表)和类别表(父表),类别表的主键是文章表的外键,文章表的外键约束是联机删除,它的意思是当删除类别表的某项记录时,文章表里和此类别记录有关的记录都会被删除。逻辑好绕。

访问postgres数据库有两种方式,一种是先进入容器,然后访问。进入容器我用的是Code的Docker插件进入的。进去之后输入用户名和数据库名就进去了。

1
psql -U vapor_username -d vapor_database

另一种方式是用Terminal访问,也就是从容器外访问。首先安装postgres到本地。

1
brew install postgresql

然后命令:

1
psql -U vapor_username -d vapor_database -h localhost -p 5432

我因为以前一直开着Proxifier,导致访问5432端口都给转发给1081端口了,所以一直登陆不上,看了Proxifier中的日志才发现这个问题。

从大学毕业就没写过SQL语句了,postgres也是第一次用,测试外键费了不少功夫。如下插入的语句,因为忘记打最后面的分号,psql还在等我输入,我又输入查询语句,啥也没显示,后面查查才知道后面要带分号。

1
INSERT INTO articles(id, name, body, category_id) VALUES('40e6215d-b5c6-4896-987c-f30f3678f604','hello','my name is vale','40e6215d-b5c6-4896-987c-f30f3678f604');

Vapor4.0对docker-Compose文件浅析

Posted on Mar 18 2020   |   In Vapor4.0   |  

上篇对docker-compose.yml的某些理解有误,这篇对某些命令进行浅解。

1
docker build -f Dockerfile -t tblog .

那个.是指上下文路径,参见这里-镜像构建上下文(Context)

1
docker-compose build

这个命令为啥先去运行Dockerfile里的命令呢?因为这个文件是用来构建tblog:latest镜像的。在docker-compose.xml中的首要任务就是构建tblog:latest, 并指定了build所需要的上下文, docker就找到上下文中的Dockerfile进行编辑了。就是下面这一段。

1
2
3
4
5
6
...
app:
image: tblog:latest
build:
context: .
...

docker-compose.xml最上面有一段:

1
2
3
volumes:
db_data:
....

这个是干嘛的呢?这个是创建一个磁盘。db_data:应该就相当于我们说的盘符。没有给这个盘指定名称,它会有个默认的名称tblog_db_data, 也可以这样指定磁盘的名称。

1
2
3
volumes:
db_data:
name: "tuchangwei"

磁盘是用来存数据的,它不会消失。多个容器也可以共享这个磁盘。我们的数据库就把数据放在这个磁盘里面:

1
2
3
4
5

db:
image: postgres:12.1-alpine
volumes:
- db_data:/var/lib/postgresql/data/pgdata

对于docker-compose.xml文件里命令的解释,可以参考这里

Vapor4.0对Dockerfile文件浅析

Posted on Mar 15 2020   |   In Vapor4.0   |  

昨天周六,被Docker中配置Vapor搞到脑袋要炸,差一点放弃Vapor的学习。但今天感觉还好,脑炸是源于对未知的恐惧。

本身相关的包依赖下载就非常的耗时,稍个不慎还要重新下载,简直奔溃。

我的想法是先建个模版项目发布一下,熟悉整个流程后,就边加功能边发布。因为要保持环境的一致性,Vapor社区比较推荐在Docker中部署,然后再把Docker部署到服务器上,模版项目中也提供了两个Docker相关的文件 Dockerfile 和 docker-compose.yml。但是网络上关于Docker部署Vapor4的资料简直是没有,看着两个文件中的命令就头大。脑中的问题一直在飞: 本地项目怎么部署到Docker容器中?是不是要先在容器中安装Swift和Postpostgres?部署的项目和postpostrges是同一个容器,还是两个容器?这两个容器怎么交流?本地项目做了更改后,Docker中的项目会自动更改吗?这些问题怎么用命令行解决?谁想谁脑炸。

正当我要放弃的时候,社区的温暖送来了🙏。

Deploying with docker is quite easy. Assuming you want to deploy a fresh Vapor 4 project:

Requirements: Install latest Xcode 11.4 Beta and switch to Swift 5.2 in the preferences. (You can check in the command line using swift –version) If you want to use Docker locally on your Mac, you should install Docker Desktop for Mac.

Run vapor new --branch=4 myProject to create a fresh project from template. (You can do any changes if you want, but the fresh template already provides a Hello World example.)

To run your application within Docker, there is already a web.Dockerfile provided in the template.
We’ll have to build an image first. Run docker build -f web.Dockerfile -t my-project . Of course you can use whatever tag (my-project) you like.
To test your image locally use docker run --rm -p 8080:80 my-project (We use –rm to delete the container when we stop the app. The flag -p 8080:80 exposes the port 80 from within the container to port 8080 on our host.) You will see something like [ NOTICE ] Server starting on http://0.0.0.0:80 in the command line. Visit http://localhost:8080/ in your browser and you should see “It works!” from your Vapor application.

If you make changes to your application, stop the container, build and run it again.

所以什么都不用管,先在项目目录下输入如下命令:

1
docker build -f Dockerfile -t tblog .

项目就开始在Docker中安装了。注意命令后面那个.别忘了,那个是当前目录的意思。

完后我按照上面大佬的命令:

1
docker run --rm -p 8080:80 tblog

并没有把项目跑起来,这里可以从两处做一下更改。一个是把命令行改成:

1
docker run --rm -p 8080:8080 tblog

因为另一个大佬说docker默认暴露的是8080端口。或者在Dockerfile文件中把最后一行改为:

CMD [“serve”, “–env”, “production”, “–hostname”, “0.0.0.0”, “–port”, “80”]

把80端口暴露出来。

Dockerfile里的命令大概解释一下,就是先在Docker容器里下载Swift5.2, 然后把本地的项目拷贝到容器里,然后编译。然后再把Ubuntu拷贝下来,把编译的文件放在Ubuntu的目录结构下。然后运行。

这个时候项目跑起来是没有数据库的, docker-compose.yml这个文件就有用了。

运行命令:

1
docker-compose up db

会安装数据库postgres,并启动数据库。

运行命令:

1
docker-compose up migrate

会在数据库中创建TODO这个表。

这个时候,你再访问localhost:8080/todos这个API程序就不会报错了。这个数据库是建在另外一个容器里的。我们既可以通过运行命令:

1
docker-compose up app

让前一个容器里的app启动,然后通过localhost:8080/todos去访问数据库,也可以直接在Xcode中运行app,然后通过这个URL去访问数据库。数据库是同一个,但是跑起来的app却是两个。Xcode跑的那个是开发用的。容器里的这个用来发布的。

如果运行命令:

1
docker-compose build

它会执行Dockerfile里的命令。也就是说和前面docker build的命令差不多。

这些命令在docker-compose.yml中都有说明。

最后我发现原来docker在国内有镜像,可以加速下载images。具体方法看这里。这个博客很不错,回头看看把Docker的知识补一补。

文中关于Docker的解释,我半靠理解半靠猜,但无论如何app是跑起来了,数据库也通了。后面慢慢练手,慢慢填坑。

12…8
Changwei

Changwei

I develop iOS/Android apps with Swift/Kotlin language.

80 posts
33 categories
34 tags
GitHub Twitter Weibo Linkedin Upwork peopleperhour
Creative Commons
© 2011 - 2020 Changwei
Powered by Hexo
Theme - NexT.Muse